
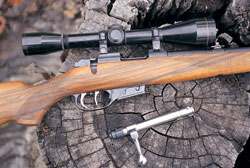
Gunstock refinishing
by John Robinson
Australian Shooter November 2001
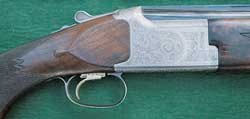 Nothing degrades the look of a gun more than
a dodgy looking stock. The better the stock wood, the more it is worth
the effort to refurbish the stock and bring out the best in the timber.
Nothing degrades the look of a gun more than
a dodgy looking stock. The better the stock wood, the more it is worth
the effort to refurbish the stock and bring out the best in the timber.
I have been refinishing stocks for many years and in the final analysis, there is simply no easy way to get a good result other than by applying patience before applying the stock finish. As the gunstocks I have refurbished have become more valuable, the care in refinishing them becomes more critical. Throughout time, however, I have developed a standard technique that has produced good results for me, regardless of the type of gunstock being refinished.
Types of stock finishes
Firstly, it is worth having a look at the types of finish likely to be found on commercial stocks, as the nature of the original finish will determine the time and effort required to refinish the stock. Older gunstocks were frequently finished with a varnish. This is characterised by being darker than the natural wood and producing a powdery white residue when scratched. This is not a very durable finish and varnished stocks will show their age fairly early. Another problem with varnish finishes is that they will mask the natural color and grain in the timber and they rarely do justice to a good bit of wood. I have unearthed some great walnut buried under a coat of stock varnish.
 More modern stocks are finished with two-pack
urethane systems. These are typically very glossy and quite hard and durable.
Remington, Miroku, Browning and Weatherby are just a few of the manufacturers
that produce urethane-coated stocks.
More modern stocks are finished with two-pack
urethane systems. These are typically very glossy and quite hard and durable.
Remington, Miroku, Browning and Weatherby are just a few of the manufacturers
that produce urethane-coated stocks.
The main problem with this finish is that it can be chipped on impact with a sharp edge and is highly resistant to normal paint strippers and very difficult to remove physically. They also tend to darken the stock and some of these finishes appear to have a stain component in them that tends to heighten this effect.
Most other stock finishes fall between these two extremes. Many high quality stocks have been ‘oil finished’ and this too will depend on what sort of oil is used. Traditional ‘boiled linseed oil’ finish is not really boiled but treated so that it dries in contact with air. Many oil finishes may go darker with time and also mask the natural beauty of a good piece of walnut. They are also not very water-resistant, which comes in handy when removing them.
 Author’s preferred refinishing method
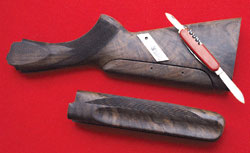
The first thing to do when refinishing a stock is to remove all the metalwork. On older guns, especially double shotguns, great care must be taken when removing the screws, as they have very narrow slots and most standard screwdriver blades will not fit them.
Check the woodwork for damage, cracks and other defects so that you can plan around them. Many stocks will also be impregnated with gun oil in the end-grain areas and this will continue to weep out of the timber if it is not dealt with in the preparation.
The stock should be washed down with a solvent, such as mineral turpentine, to remove any oil or grease from the surface and out of the surface pores of the timber. If oil continues to seep out of the end grain, more washing of these areas should be done until the weeping stops. Heating the wood with a hot air gun will also accelerate the removal of oil in the pores of the timber, as will wrapping the affected area of the stock tightly in absorbent paper towel and leaving it for 24 hours.
The basic rule of this stock-finishing method is not to use sandpaper. The aim of refinishing is to maintain the original contours and lines and this is almost impossible if you start wearing it away with sandpaper.
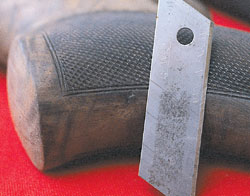
 The tools I use go back to the joinery and furniture industries and in those days were called cabinet scrapers. The original cabinet scrapers were hardened steel plates that were deliberately burred along one edge. By drawing the cabinet scraper across the wood’s surface, a very fine shaving can be removed. Also, the contours of a complex shape can be followed.
In the 21st century, I use both blades of a Swiss army knife and a section of breakaway utility knife blade. These good quality steel blades hold a razor edge and provide the scraping action when drawn sideways across the stock surface. The curved surfaces of the army knife blades are good for concave surfaces and the pointy end of the utility knife is ideal for working around chequering and into corners.
These tools will remove most stock finishes by scraping them away while removing little or no timber. It usually takes me about four hours to completely remove the finish from a rifle stock. If the scraping is always done with the grain, the wood will retain its smooth finish and chatter marks will be avoided.
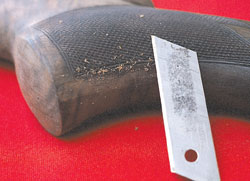
Working around chequering needs to be done with care and the sharp point of the utility knife blade is also useful for cleaning out the chequering. In earlier times, I used a caustic paint stripper to remove finish from clogged up chequering. This is messy and it is dangerous material to handle, as it will burn skin and is highly dangerous if it gets in an eye. Instead, I have found that a heat gun and a stiff fine wire brush do a better job. The heat gun will quickly soften most finishes, allowing them to be brushed out.
The heat gun also provides a solution for urethane-finished stocks that are resistant to the scraper treatment. The heat gun will soften this coating and it can be scraped off relatively easily.
 Once the finish is removed, I use fine steel wool to work the stock to a smooth finish. The scraper can be used to remove stock defects, provided that they are not too deep. The steel wool will not remove any wood and will produce a fine finish to the timber with a bit of work.
‘Whiskering’ the timber by wetting is it an old technique but a good one; this raises the loose fibres and allows them to be rubbed off with a subsequent steel wool treatment.
The quality of the end result is totally dependent on the work that goes into finishing the wood and by the time the preparation is finished, the wood should have a shine of its own without any finish yet applied.
The next step is to fill the pores in the wood. I have found Birchwood Casey’s Gunstock Filler hard to beat. It can be rubbed on with a soft pad and dries to touch in about 20 minutes. A couple of coats of this, with the surplus being rubbed off between coats with fine steel wool, will produce a smooth and non-absorbent surface ready for the final coat.
 I do not use any stains, as I prefer the natural
color of the wood, assuming it is walnut. There are a number of proprietary
gunstock finishes available. Birchwood Casey’s finish is a good one for
ease of use. This is rubbed on by hand and repeated coats will produce
a smooth and shiny finish.
I do not use any stains, as I prefer the natural
color of the wood, assuming it is walnut. There are a number of proprietary
gunstock finishes available. Birchwood Casey’s finish is a good one for
ease of use. This is rubbed on by hand and repeated coats will produce
a smooth and shiny finish.
I do not like glossy finishes, so have developed my own finishing treatment that brings out the best in the wood while being fully waterproof and easy to repair. I firstly work the surface with a hard Carnuba wax, using a firm cloth pad. Several applications may be required, along with some elbow grease, to produce a low-sheen finish on the stock that has the appearance of an oil finish.
The final finishing coat is a commercial silicone spray, available from specialist auto accessory suppliers. This is best sprayed onto a soft cloth and then rubbed into the stock. I keep a silicone treated rag in a sealed container and wipe the stock with it with each use. The silicone is also completely compatible with the metal parts and provides additional protection from corrosion in these areas.
Throughout time, this produces an attractive and durable finish that brings out the best in the timber. After doing more than a dozen stocks with this finish, I have found that it has continued to exceed my expectations for appearance and ease of maintenance.