
Hunting with a map
by Richard Barnsley
Australian Shooter September 2002
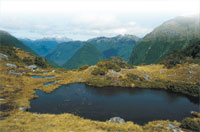
Twenty years ago I shot my first chamois high in the backblocks of New Zealand’s Nelson Lakes National Park. It took several days of hard walking to reach the mountain basin where I intended to hunt, but long before my boots started hauling up the alpine snowgrass, I knew exactly where I was heading.
 From the comfort of my living room thousands of kilometres from the hunting ground, I’d already plotted the prime areas to hunt and how to get there. Years of experience in remote country have honed my skills in map reading. For the stalker keen to get among the trophies, an ability to read a topographic map is essential.
These days there are not many places throughout the globe that have not been surveyed and topographic maps are the result. A topographic map uses contour lines to record variations in height and the position of rivers, mountains and valleys. This information is invaluable to the hunter, both in accessing and leaving rough country safely as well as anticipating the better locations to find game.
This article outlines how to read a topographic map accurately and relate the map to actual features in the bush. Master these two skills and you’ll find yourself travelling safer and easier when the going gets rough.
Maps come in a variety of scales, with the most practical for bush work being a 1:25,000 topographical sheet. Maps for your hunting area can usually be obtained from local lands departments or camping stores.
Orientating the Map
To use a map properly in the bush and relate it to the surrounding country, it is vital that firstly you orientate the map. This is simply done by laying a compass on the map and rotating the topographic sheet until the north-south gridlines are running parallel with the north arrow on the compass.
Annual variations in the earth’s magnetic field can influence changes in the north aspect of the sheet; however, the variations are generally only incorporated when absolute precision is required.
 Gridlines
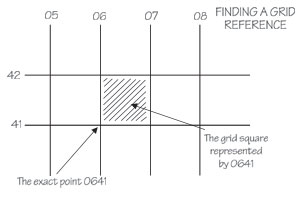
Gridlines consist of parallel lines that run north to south and east to west. They provide a reference for locating any given point on the map. Gridlines are numbered along the bottom of the sheet and up the sides.
To locate any given point, read along the base of the sheet and then up the gridline to where they intersect in the lower left-hand corner of the grid square. This will give you a four-figure grid reference. For more detailed locations, a six-figure reference is often used, but for general bush work four figures are sufficient.
Contours
Elevation: Contour lines are used to join areas of the same height above sea level. Consequently, if you walked along a contour line you would be neither climbing nor descending, but traversing along the same altitude.
Contour lines are labelled with the height in metres above sea level and certain points such as hilltops will also have their height marked in metres. Thus, you can use contour lines to determine the distance you will have to climb or descend to reach any point on the map.
Pattern recognition: Every landform has its own distinct contour pattern. By familiarising yourself with contour patterns, it will become second nature to identify gullies, ridges, gentle slopes and saddles.
Slope and contour interval: The standard elevation difference on a 1:25,000 topographic map is 25 metres. The closer the lines are together, the steeper the distance between them. Wider gaps signify a more gradual slope.
Reading the contours: Contours are used to provide a picture of the shape of the land. This information tells you whether any route is up or down, sloping left or right, steep or flat.
Distance
All maps will have a distance scale, generally located at the bottom of the sheet. To measure the distance between two points, hold a piece of string between them on the sheet and then compare this length to the scale. This will tell you the distance in kilometres. Remember that a single grid square on a 1:25,000 sheet is one kilometre by one kilometre.
 Using a piece of string also allows you to determine distances along bent features such as a river course. Mould the string to the winding feature then pull it straight and measure against the scale. This greatly assists you in estimating travel times and distances across country.
As a rule of thumb, most people, depending upon loads carried and fitness level, will walk across light country at a rate of three to four kilometres per hour. Time yourself when out in ‘the weeds’ and develop your ability to estimate time required to travel between points.
The ability to read contours allows you to pick the best route when travelling cross-country. The old adage that the shortest distance between two points is a straight line doesn’t hold up when travelling in the bush. Remember that gullies and creeks often hold thicker vegetation and it may be easier and quicker to climb a ridge and skirt such obstacles.
Direction
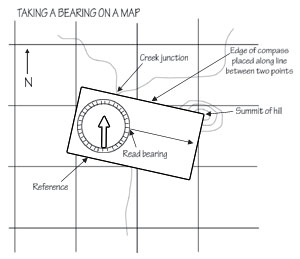
To determine the direction you are travelling:
1. Align the side of the compass along the gridline of the map.
2. Rotate the capsule housing until the reference arrow is aligned with the north grid.
3. Read the bearing against the mark on the capsule housing.
To head off in the direction you have just plotted:
1. Rotate the whole compass until the reference arrow is aligned with magnetic north.
2. Hold the compass in this position and sight along the ‘direction of travel arrow’. When following a bearing cross-country, it is best to sight a close landmark, walk to it, check the bearing forward to another landmark and in this way ‘hop’ from feature to feature.
Choosing a Route
Following features/reference points: Remember my earlier comments about picking a route and travelling times. Even when sidling around steep country the going is often slow, as you have to take care with every step. It may well be easier and quicker to climb higher and follow a ridgeline to your destination.
Triangulation
This simple exercise is invaluable if you become lost or disorientated; however, it will only work if you can locate three features such as hilltops and is virtually useless in flat country:
1. Locate three features that you can identify on your map sheet. It may be necessary to climb onto a ridge or vantage point to get a good sighting picture.
2. Take a bearing to each feature with a compass.
3. Plot the bearing on your map by drawing a line from the feature back along the map. Every map case should include some string and a pencil.
Where the three lines intersect is an approximation of your location. Don’t be alarmed if the result is a small triangle, as it is nearly impossible to get a perfect intersection. Your position is located within this ‘triangle of error’.
The basics of good navigation are not difficult to learn; practise them whenever you head bush. Alternatively, join an orienteering club or bushwalking group for a day’s familiarisation.
The ability to correctly use a topographic map in the bush is not only invaluable should you become lost or when plotting a route but also when trying to locate game. Once you can relate contour lines to the surrounding topography, then anticipating where game may be is much easier.
While planning my chamois hunt I concentrated upon north-easterly tussock basins that received the most sun. High country animals favour such places for resting because they are warmer and often the feed growth is heavier. By selecting such places I increased my chances of finding animals. Knowing how to read a map also enabled me to avoid steep and dangerous country when accessing my hunting grounds.
When planning your next hunt to unfamiliar territory, obtain the relevant 1:25,000 topographic map. Spend a few nights at the kitchen table relating the behaviour of your game to the jumble of dots and lines on the map. The result could very well be a safe and productive hunt.